Monday, April 29, 2013

Adventure Sticks

*Monday with J, guest post.


A little something to bring along with you on your quest…no matter how far a distance it may be. A simple stroll down the road can become a magical expedition when you pack imagination. Kids teach us this. They remind us of the simple pleasures that get squeezed out of our cluttered adult brains. They have yet to be subjected to the unnecessary games we begin to play with ourselves as we move through life…and so they just be…and they dream.

There is something very grounding about walking with a stick. Maybe it provides focus; a feeling of purpose, or perhaps it calls to the adventurer in us. 

Step outside on the sturdy ground; observe nature’s illustrations, hear the outdoor orchestra, and take in the organic aromas of the earth in spring. Make a moment. Make a memory.

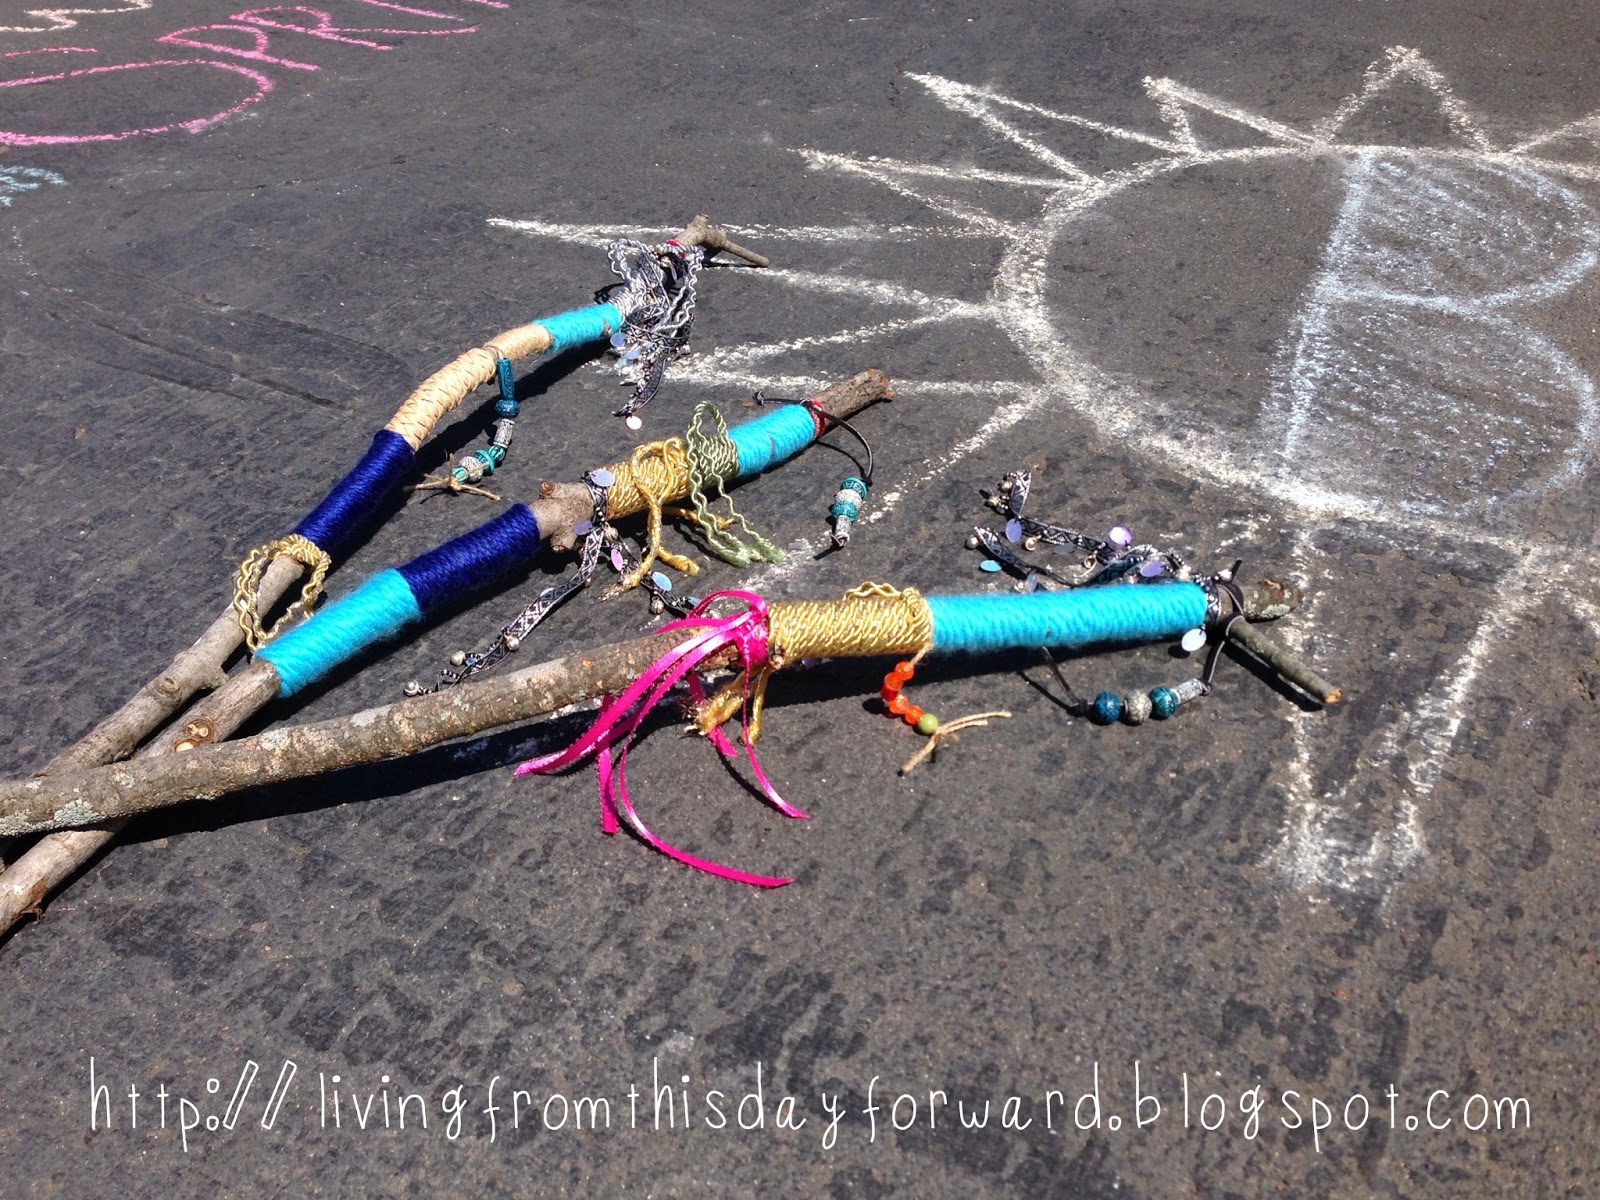
I’ll call this project… Adventure Sticks.

Supplies:

Large Sticks
Yarn/String/Decorative Trim/Ribbons (any scrap will do!)
Beads
Tacky Glue (surprised?)


We set out searching for the perfect branch. Our sturdy maples have been thoroughly schooled by Mother Nature this year so we had plenty to choose from right in our backyard. The kids wanted to find a nice thick stick that reached their shoulders, and begged them for a chance to shine.


If you have the gift of nice weather, this is a perfect activity to do outside. Round up your supplies and hit the driveway or lay an old sheet out in the yard.

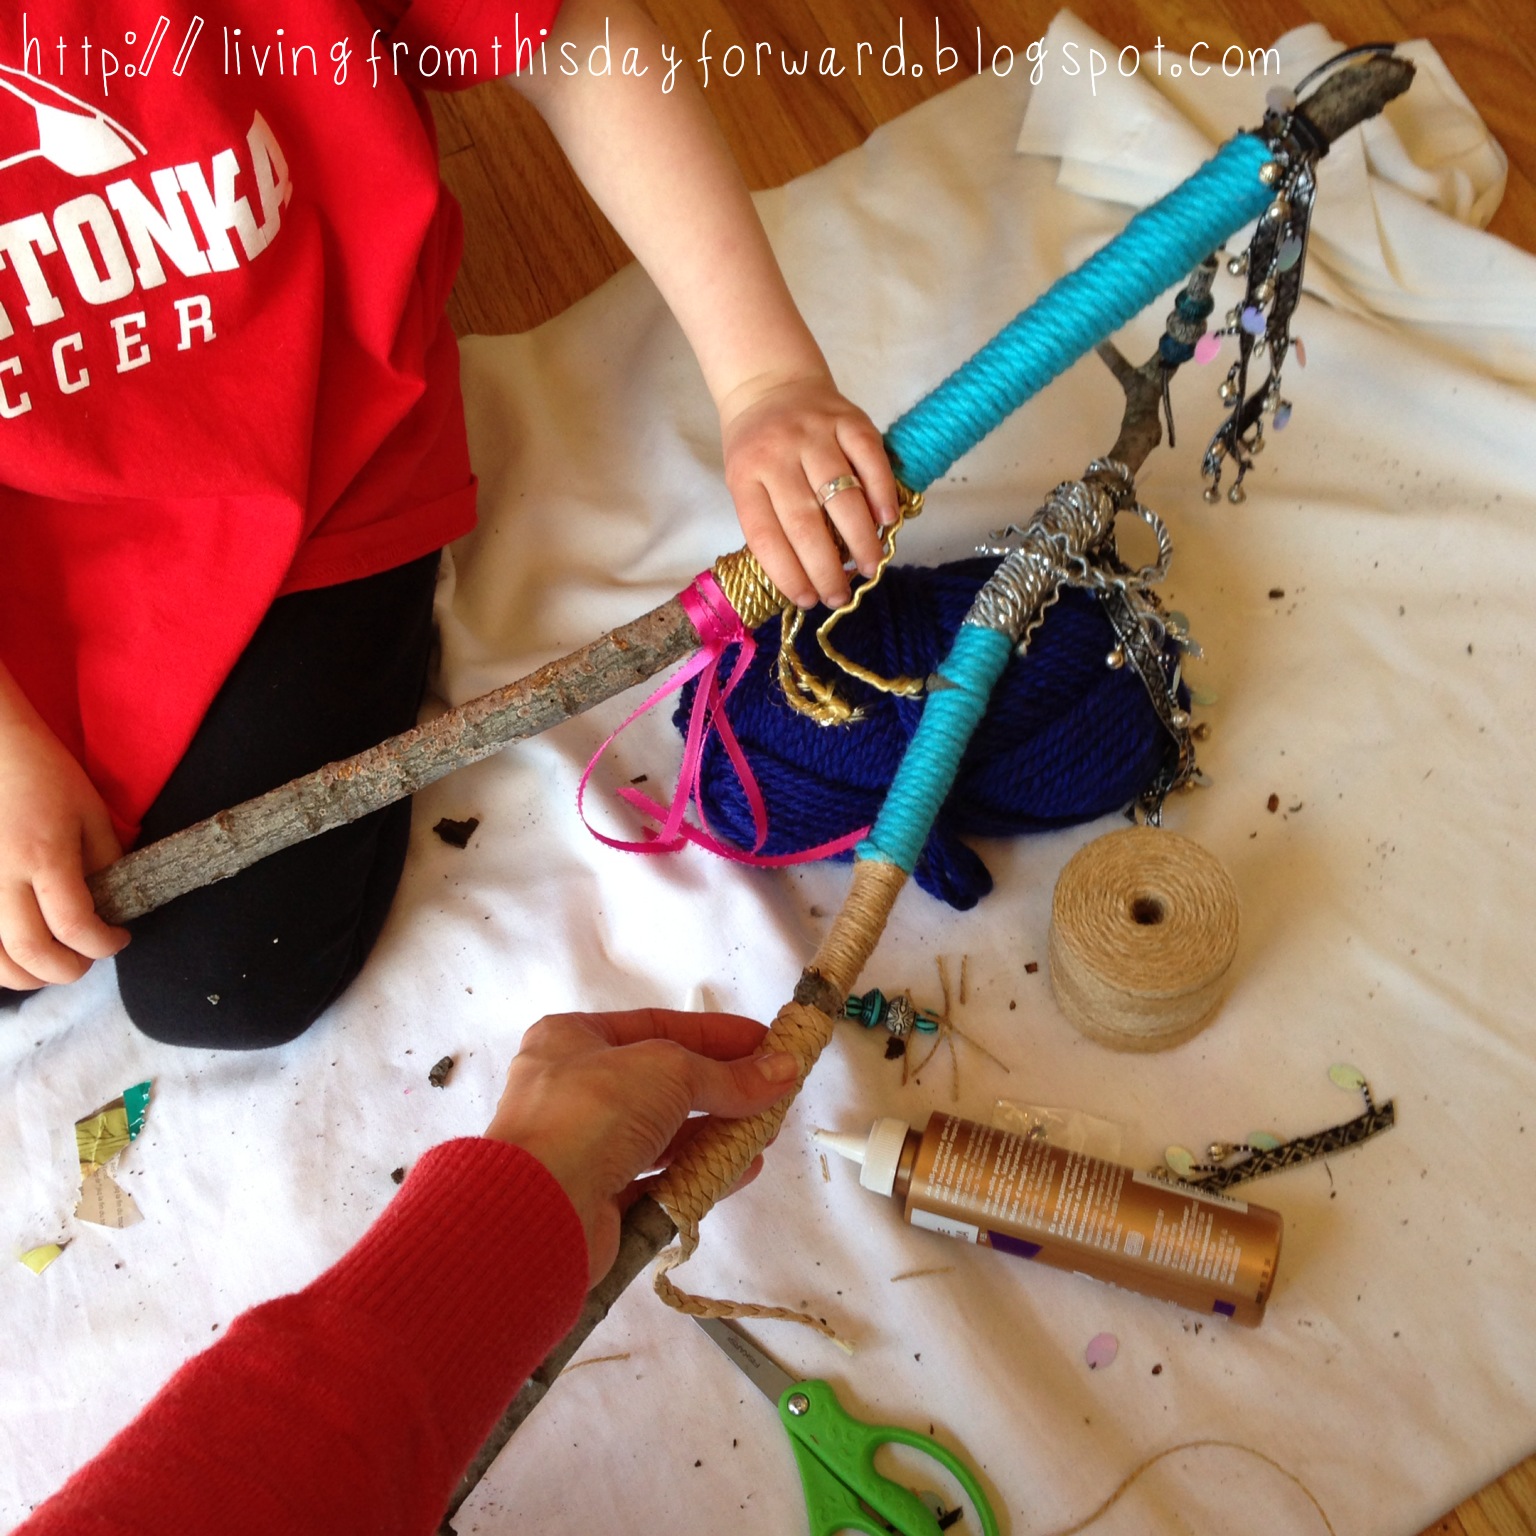
It’s really very simple. Choose the materials that you are drawn to begin to fasten them to the stick. I like having a nice comfortable handle so we wrapped yarn tightly around the spot that feels natural to hold. You will find many types of cord and trim at fabric/craft stores that would work well.


The babes loved the dangles so we beaded strings and frayed metallic cord to make tassels. Knotting ribbon in various lengths creates texture as well. One of our favorite trims had tiny ornate bells strung with beads.

I love the blend of the natural and the brilliant.


Explore your backyard, take a walk down the road, hit the trail to your favorite park, or carve your own path in nature. Dream up stories of the magical powers the sticks may hold. 

Maybe you’ll use the stick as a tool for awareness and work through something weighing on your mind while you walk…pray on your journey, work out a stress, or relish an accomplishment.

How about gifting an Adventure Stick (or: Courage Stick, Grounding Stick, etc.) to an important adult in your life? The walk through life can be hard and once in a while we need something to lean on while we collect our strength.  

As we walk, I listen to the faint jingle of the bells tied around the stick respond to the rhythm of their tiny footsteps, and I mentally bottle it.

Their small hands grip the soft, comfortable threads wrapped around the branch. They like the way it feels against their skin. Occasionally they glance at their hand and admire its beauty.


Today remains a day of contradiction for me: one of great loss and of great celebration. I will honor the father I lost far too soon with a walk in nature with my babes. It’s what would make his heart happy… and ours.

What's on your mind? Leave a comment or share a thought below – I love to connect.

Cheers!
J


*I'm J...a single mama of two, who hit a big bump in the road, navigating my way down an unexpected new path one day at a time. My babes are my light and my lens to see the best in everything. We play, we create, we explore, we laugh, we love. The laundry is a little backed up, and dinner may be less than impressive, but our hearts are full and we'll sleep well tonight. Grab your munchkins and join us for some fun...this is what we're up to today!

Monday, April 22, 2013

I love you because... {Love Jars}

*Monday with J, guest post.


I feel I've always had an appreciation on some root level for my mother - who she is, the way that I felt  in her presence - safe, secure, and important, for the adventures and experiences she provided us with, and for the strength she has demonstrated through adversity. She taught us to love and care for others equally and housed an immense amount of compassion for others. She has always possessed a unique blend: capable, dreamer, planner and free spirit. I'm not certain what percent of her I am inside, but it's a significant and vital piece within.

However, it wasn't until I welcomed my own children into my arms and heart, that I awoke to just how deeply that appreciation runs. It's a profound recognition, a full circle ah-ha moment when you realize you are really one and the same, by design, as woman and mother. You share the same dreams - the same worries, challenges, guilt, accomplishments, celebrations, and rewards.

This has long been a favorite gift to give. I've offered it a few times throughout my life when the occasion or recipient is so special, a material gift just won't do. I would say Mothers are such recipients, and that this would make a wonderful Mother's Day gift. Don't forget the other moms in your life as well...friends, sisters, grams, etc.

I'll call this project: I love you because.. {Love Jars}

Supplies

Container: Glass Jar w/ Cork Top, Small Metal Bucket, Mason Jar, Flower Pot
Paper (see suggestions below)
Embellishment: Paint, Markers, Silk Flowers, Ribbon
Scissors


For the version of this project I'm helping to organize in Little Lady's preschool classroom, we are using small pink buckets as a container. Measure a piece of green construction paper long enough to wrap and line the inside of your container. Mark the paper with lines, halfway across the width, and along the entire length of the paper, and have your babes practice fine motor skills by cutting on the lines to create grass (think fringe). Line the container with the fringed paper and tape the ends together to secure.

A terra-cotta flowerpot would make a sweet container as well. Your babes could personalize them with acrylic paint and embellishments. 

You could wrap a yummy piece of ribbon around the neck of a Mason Jar and tie in a sprig of silk flowers for texture.

Now it's time to get cozy...grab some paper and a pen, and create the real gift. Reach to the past to gather all of your best memories related to, or created by, that particular Mama. What do you love most about her? What has she taught you? What feelings surface when you're thinking of her? Swell her heart. She deserves it. Write these memories and thoughts on small slips of paper. Fold them accordion style and fill up the jar with love. 

You could pen the notes on the back of sheet music or decorative paper to add color and interest. How about making copies of old photos with mom/gramma/sister and write on the back of those?! Eeek…I’m doing that. (Mom is reading…act surprised, Mom.)

I copied photos on card stock in both color and black & white for variety and penned my memories and praises on the backside. The pictures look great displayed in the glass jar. I made sure to add one of my favorite shots of Mom as a little girl. Treasure.


Don't forget to add a tag noted: I Love You Because...

Most of all the other beautiful things in life come by twos and threes, by dozens and hundreds. Plenty of roses, stars, sunsets, rainbows, brothers and sisters, aunts and cousins, comrades and friends - but only one mother in the whole world.  ~Kate Douglas Wiggin

Leave a comment or share a thought below – I love to connect!

Cheers!
J


*I'm J...a single mama of two, who hit a big bump in the road, navigating my way down an unexpected new path one day at a time. My babes are my light and my lens to see the best in everything. We play, we create, we explore, we laugh, we love. The laundry is a little backed up, and dinner may be less than impressive, but our hearts are full and we'll sleep well tonight. Grab your munchkins and join us for some fun...this is what we're up to today!

Monday, April 15, 2013

Conversation Cloth

*Monday with J, guest post.


I'm a highly sentimental being. Maybe it's a product of learning big loss at a very young age, witnessing first hand that each moment that passes is one less we may have in this place or with these people. Or perhaps it's in my blood, passed down from a mother and grandmother who cherish every little bit of every little thing that ever made a memory. In any case, I think it has much to do with the little things...noticing fine details within the big moments. Those snippets are what pull at my heartstrings hardest and become the headliners in my collection of memories.

I like tradition and ritual and the love that is poured into them. I like understanding and revisiting my roots. I like having snapshots into my childhood and the idea of knowing that I’m able to create the same for my babes.

Sentiment and nostalgia are the inspiration for this project.

I laid out a large piece of cloth on the dining room table. I spread an assortment of fabric markers on the cloth and invited my babes to join me. You can imagine the delight in my children's eyes when I explained to them that I this is a tablecloth that we can draw on...draw anything we wish. 

Not much is off limits when it comes to creativity in this house…but writing on the table? New level. They glanced down at the cloth, back up at me with an ‘are you sure’ expression, and then started in with big grins.

I knew it would be an instant hit with Little Lady. What surprised me is that big brother joined in just as enthusiastically. He stretched himself creatively and quietly commented how much he loved the project numerous times during our sessions. The first picture he surprised me with was a little red heart with ‘I love you Mom’ penned inside. Melt. Puddle. Clean up in aisle 1.

I sat with them and sketched a few messages and pictures, and we created the kind of moments together that I dream they'll carry with them…to add to their little suitcases full of the bits that I’m hoping will serve them well throughout their journey through life.

We will bring this cloth out, now and again, as they grow. We’ll invite cousins to join us and leave their mark. We’ll capture Nanni & Poppa’s autographs and commemorate holidays and milestones. And each time we spread it on the table, we’ll take a minute to recount it contents and its meaning to our hearts. 

I’ll call this project… Conversation Cloth

Supplies:

Large piece of sturdy cloth to fit your table (think ~ 8 in. hang over on each side)
  -there are many fabric options: heavy cotton, twill, canvas, etc.
Permanent Fabric Markers
Sewing Machine or Iron Seam Tape (if you need to finish the edges of the cloth)

It is best to choose a heavy-weight material to draw on. The fabric doesn’t shift around or scrunch as much as the kids draw and the markers bleed less, allowing for cleaner lines in their art. I chose canvas in a natural tone.


Keep in mind that if your fabric has high cotton content you are going to have to iron it after washing. Cotton has a tendency to wrinkle. I think an 8 in. overhang on the sides of the tablecloth looks nice.


Purchase a set of permanent fabric markers at a craft store, or craft department of a discount store. It’s important to use something permanent, made for fabric, so that it will withstand any necessary washing. I washed my cloth before to remove any factory finishes that may prevent your markings to set permanently. I had to iron after washing as well. 

Spread the cloth on the table. If you are worried the markers will bleed through the fabric (depending on it’s thickness) place cardboard, poster board, or craft paper underneath while they draw. Note: follow the instructions on the package of your particular markers so you know how to properly care for the finished piece. You may want to test wash a small piece before attempting to wash the decorated cloth. 

Throw structure to the wind and let them draw whatever their hearts desire. Sit down beside them and make a moment.


Let the babes doodle while you prepare dinner. Make a tablecloth for a birthday party and let the children draw and sign their names. Bring out the cloth on the holidays and have loved ones leave a special message. Or consider personalizing a cloth as a gift for someone special.

“Of the most valuable treasures in my life are those moments woven from both the past and the present.”       -Mama

Leave a comment or share a thought below – I love to connect!

Cheers!
J


*I'm J...a single mama of two, who hit a big bump in the road, navigating my way down an unexpected new path one day at a time. My babes are my light and my lens to see the best in everything. We play, we create, we explore, we laugh, we love. The laundry is a little backed up, and dinner may be less than impressive, but our hearts are full and we'll sleep well tonight. Grab your munchkins and join us for some fun...this is what we're up to today!


Monday, April 8, 2013

Wish or Worry...

*Monday with J, guest post.


We all have wishes. We all have worries. Sometimes we wish we didn’t worry so much.

This is a project from my childhood that I took great pleasure in sharing with my own children earlier this year. I stumbled upon these tiny dolls in my storage room in a Caboodle (yes, you know it – small plastic container from your tweens that probably held your royal blue mascara) ...mixed in with my stash of colorful embroidery floss. This collection of vibrant string has seen the age of the friendship bracelet, cross-stitched my first 4-H sampler for entry in the county fair, and has woven clothing for little dolls made of Q-tips.

I picked up one of the characters and sat for a few moments, lost in the memories they stirred. I spent many an hour as a young girl creating collections of these little friends - while my mom was sewing away in the background - detailing each personality while experimenting with skin tones, hair textures, and clothing options. Some were fashioned to match or represent my friends and family. 

A childhood friend and I once made them to sell at our annual garage sale, alongside the friendship bracelets we labored over and stockpiled for weeks in advance. Little entrepreneurs, we were.

I guess the dolls were my version of the traditional Guatemalan worry dolls gifted to me as a souvenir when I was young…they were brightly-hued bitsy people, said to free you of the worries that you whisper to them in confidence. 

I’m a huge fan of working it out…reflecting, sharing feelings - good or bad - with loved ones in an effort to purge the hurts, cleanse the muddies, and celebrate the wins. A clean slate lends itself to fresh ideas. I’m keen on anything that encourages my babes to identify and deal with what’s inside. Perhaps these trustworthy little friends would be a good tool for your little ones to hand off the worries. 

I also believe in dreaming big dreams. Verbalizing your dreams and giving them life is the first step to chasing them. I like to think these dolls are great at multi-tasking and capable of big things...so share your worries, whisper your dreams, or makes a wish.  

Let's get started. Don’t worry…they’re easy.

Supplies:

Q-Tips
Embroidery Floss
Tacky Glue (thinking I should own stock in this by now…)
Seed Beads (optional, for eyes)
Scissors


(why does that arm look so lifeless...?)

You’ll start by cutting Q-tips to the proportions in the photo below. Glue the pieces together as shown with thin lines of Tacky Glue and let them dry. The fluffy ends of the Q-tips will serve as the head.


 Choose your gender, skin tone, and clothing style. Directions below for detailing your dolls…


For long hair dolls…start by gluing the end of the embroidery floss just below the neck on the side you designate to be the doll's back. Hold it down with your thumb while you begin to wrap the floss around the narrow neck part of the doll working your way up, over the fluffy section, row by row until the whole area is covered. Leave a small tail at the end to glue down to the back of the head when finished. You will glue the hair on as a separate piece once the doll is clothed.

For short hair dolls…begin by cutting small segments of floss in the desired hair color, about ¼ to ½ inch long. Glue these pieces to the top portion of the head section first, and then wrap the head in skin tone string (as detailed above) covering the base of these strands to finish. The hair will stand off the top of the head. You can give it a little haircut after the glue dries.

For clothing…you will follow this same stacked wrapping technique. Glue a small tail down to the back of the doll, hold it in place, and begin to wind and wrap the string around the body until covered. Finish by gluing a short piece of string down to the body.

For pants, I begin to wrap the waist section as listed above, but then I weave in and out of the sticks in a figure 8 pattern to give the appearance of separate legs. You can see an example of this in the picture up above with the red string. 

Blonde, brunette, redhead...short, long, curly…the options for hair are endless!
For curly hair, my own Mama taught me to dampen embroidery floss before wrapping it tightly around a wooden cabob skewer. Let it dry completely and you will have springy beautiful curls when you unwind!


Depending on how long you want the hair, wind string around two spread fingers to make a loop in the desired thickness. This will be the length of the hair laying across the dolls head, shoulder to shoulder. You will wind a bit more string around the middle point of this section of floss, just to hold it together. That will be the point in which you glue the gathered hair to the head of the doll.

Little Lady requested a Santa over the holidays. We plumped him up with a couple extra Q-tips on his belly before wrapping. (see middle figure in bare body photo earlier in post) She also requested Merida, from Brave. We let her firey locks flow. 


My little guy insisted the dolls have eyes. We rounded up some seed beads….big blues, of course. I prefer the less intense look of the expressionless faces, myself.

Paint and decorate a little wooden box for your dolls and keep them bedside. You can find an assortment of wooden treasure boxes at any craft store and customizing them is a project itself!

Throw your worries to the wind and set your dreams into motion…

Cheers!
J


*I'm J...a single mama of two, who hit a big bump in the road, navigating my way down an unexpected new path one day at a time. My babes are my light and my lens to see the best in everything. We play, we create, we explore, we laugh, we love. The laundry is a little backed up, and dinner may be less than impressive, but our hearts are full and we'll sleep well tonight. Grab your munchkins and join us for some fun...this is what we're up to today!

Monday, April 1, 2013

Love Letters


*Monday with J, guest post


Those cheerleaders, who have shared their words of love, support, respect, and admiration with me, have blessed me. I strive to be attentive to reciprocate that love and model this act for my babes. Maybe we all DO just need a little more Luv. If it makes the world go round we better get to it.

This is a simple project that was born out of desperation for some entertainment to get us through the Sick Days. Yes, that phrase requires caps. Mama was reeeallly sick. Little Lady followed soon after. It’s very winter here yet. And little boys have LOTS of energy and can burn through a week's worth of activities within a single afternoon, when Mama is tied to the couch in the fetal position, peeking one tired eye out of the blanket. A stack of unread magazines caught my eye and here we are.

I’ll call this project…Love Letters

Supplies:

Magazines, Newspaper, Junk Mail
Folded Cards
Envelopes
Scissors
Glue Stick


We started by brainstorming the phrases we’d like to write on our Love Letters. A few ideas are: Thank You, I Love You, Smile, Somebody Loves You, I Demand 20 Kisses…too ransom? I’m Watching You…definitely ransom. I digress…

Depending on the age of your babes take the opportunity to infuse education by identifying the letters you need to build the words and phrases on your cards. Sound them out together…L-L-L, O-O-O, V-V-V, E. We jotted them down on a note board as a reference. It also provides an opportunity for the littles to practice penmanship.


Page through your materials: magazines, newspapers, or junk mail, whatever you have lying around, in search of those particular letters. Cut the segments out and set them aside. Once you’ve got what you need, arrange the letters on the cards and glue them down to secure.

Now it’s time to spread the LUV. Add personal notes inside the cards to celebrate the recipient. No superficial fluff here…we’re talking warm, fuzzy, personal, authentic expression. Go there. Make someone’s day. Tickle their souls.

How often do we get real mail anymore? Drop the notes in the mailbox to sprinkle a little glitter on a loved one’s day. 

The one thing we can never get enough of is love. And the one thing we never give enough of is love. ~ Henry Miller 

Cheers!
J


*I'm J...a now-single mama of two, who hit a big bump in the road, navigating my way down an unexpected new path one day at a time. My babes are my light and my lens to see the best in everything. We play, we create, we explore, we laugh, we love. The laundry is a little backed up, and dinner may be less than impressive, but our hearts are full and we'll sleep well tonight. Grab your munchkins and join us for some fun...this is what we're up to today!

Monday, March 25, 2013

Hunting for Spring...

*Monday with J, guest post

We play, we create, we explore, we laugh, we love. One of our favorite ways to do so is by heading outdoors. We have a favorite hideaway up the road where nature, and a nod to my roots, lies. This hideaway brings me back to my childhood to share the delight in ‘exploring’ with my babes. 

I spent so much time outside as a child…running the neighborhood ‘field’ with my best friend before the rest of the houses sprouted one-by-one to fill the expanse; exploring Camden State Park – plunging into the ice cold swimming hole and wading through the river just over the rocks, pursuing mud-dwelling creatures; and riding horse with my Mom on the un-groomed trails of southwestern Minnesota – lost in imagination and lulled by the steady rhythm of my horse's gate.  

Although it’s winter here, with no signs of thawing (thanks, March), we take advantage of the days when the sun shines. So, we ride bikes around the ice clusters and we set out on outdoor scavenger hunts.
    
  
I’ll call this activity…Hunting for Spring 

Supplies:

Your Babes
Imagination
Paper
Clip board (not necessary, but feels official – check the dollar store)
Marker
Treasure bag
Camera – optional

We start out with a clipboard. Clipboards make things feel important and official. Come to think of it, I may start securing my ‘To Do’ list to a clipboard, or my grocery list, and carry it around with me in the store. Spice things up. 

We brainstorm items that we may find on our trek…


We take turns checking off the items we come across, and to take it a step further we snap photos of them for our records. On occasion, we collect a few rocks because, well, you know we love rocks. My babes immerse themselves in adventure while we hike, taking in the sights and sounds of the space that surrounds us. We inadvertently take turns reminding each other of how amazing the nature all around us really is. Children see things through a different lens and I love what they make apparent to me. 

For our recent scavenger hunt they stuffed their backpacks full of the necessities…water bottle, snack, Nerf gun, chapstick, and stuffed lovies. The adjacent neighborhood road felt lengthy that day and they were prepared. 


This particular scavenger hunt will always remain special to me. It was November 10th…in the Upper Midwest…and 69 degrees. Rare weather, to say the least, allowed us to shed our coats and make a pit stop to wade barefoot in the river! Little Lady's face translates the exhilaration perfectly.


Print the photos you snapped during your trek and make a book out of them, with the Scavenger List as your cover page - you’ve got another project!

"In every walk with nature one receives more than he seeks."   -John Muir

Cheers!
J

Visit J at http://livingfromthisdayforward.blogspot.com 


*I'm J...a now-single mama of two, who hit a big bump in the road, navigating my way down an unexpected new path one day at a time. My babes are my light and my lens to see the best in everything. We play, we create, we explore, we laugh, we love. The laundry is a little backed up, and dinner may be less than impressive, but our hearts are full and we'll sleep well tonight. Grab your munchkins and join us for some fun...this is what we're up to today!

Tuesday, March 19, 2013

Treasure Tokens


*Guest post by J


There is a hero in my life: an unsung hero, named Sarah. She is my sister and my friend. I have to believe that she dons a cape under her clothing detailed with some sort of symbol that suggests my rescue and protection. She is careful not to draw attention to herself and keeps her cape tails tucked in tightly. If I thought I held an understanding of her powers before, it was an inadvertent underestimation. When it has mattered most, she stood strong – for me.

Sarah is a creative marvel. She finds her happy, contentment, peace and confidence in creating, and it is more of a way of existence vs. hobby. We are cut from the same cloth.  

She is the inspiration for our project this week. While brainstorming a craft to share with her Girl Scout troop, she recalled salt dough. Growing up we played with salt dough and were gifted handmade Christmas ornaments shaped from it. She mixed up a batch and began to experiment with the pliable medium, her creative instinct driving her. Her beautiful daughters joined in the session resulting in treasures and tokens in various shapes and sizes: round coins with stamped patterns, plump hearts, and smooth coils.

She added layers of detail and sparkle with paint and polish.  What started out as a few inexpensive common household ingredients, became a unique treasure.

I was looking for the perfect little symbol to share with the girlfriends that I would be traveling with on a milestone adventure, of sorts. The trip was monumental for me, for many reasons, and it felt deserving of something ceremonial to mark the occasion. The connection was made and I decided on a salt dough stone.  (*more dedicated to that beautiful memory in the following days...)   

I invited Sarah and her girls over for a creative session with cousins. Each of the children had their own unique ideas, and the results gave light to their individual imaginations.

I’ll call this project: Treasure Tokens (insert: of appreciation, love, celebration…)


 Supplies:

Dough:
Flour (1 cup)
Salt  (1/2 cup)
Water (1/4-1/2 cup)

Impression Tools:
Rubber Stamps (with raised patterns)
Objects with interesting patterns (costume rings, Legos, buttons)
Toothpicks (create dot patterns)
Cookie Cutters
Spatula
Cookie Sheet

Bake:
Oven - 200-250 degrees for baking the dough creations

Embellishment:
Acrylic paint / Spray Paint / Fingernail Polish
Small paintbrushes


In a small-to-medium mixing bowl, combine the three dough ingredients until a ball forms. Start with half the amount of water listed above, and slowly add more as needed. Your goal is a smooth ball of dough that doesn’t stick to your hands or working surface. If your dough is too sticky just add a little more flour until it's just right. 

Dust your work surface with flour to keep the dough from sticking. We found working directly on the cookie sheet to be a convenient method as well. When your dough is ready – dig into it! Your babes will love the way it feels in their hands. 


For coins (round tokens) pinch off a small chunk of dough and form it into a ball with your palms. Push or tap the ball down lightly and evenly to a desired thickness. Use different objects to make an impression in the dough. We used rubber stamps, a flower costume ring, toothpicks points, and Legos for interesting prints. If you want to design a pendant for a necklace, poke a hole in the top of your objects with a toothpick. Make it a bit larger than the cord you plan to use - the dough swells a bit while cooking. 

Lego man head = salt dough fail. Lego plate = salt dough win!

You can store your dough in the fridge for a few days if you have leftovers.

Place your dough treasures on a cookie sheet and bake in the oven (250 degrees – or 200 if your oven runs hot) for about 2 hours. You want the dough to completely dry out and harden to prevent future molding. If it's a bit spongy, it's not ready. 

When they are dry and cool it’s time for embellishment. Sarah discovered that the ticket to a really smooth surface is to sand the object with a fine/light sandpaper before painting. You will feel the bumps or cracks begin to smooth out. 

Next, I sprayed them with a light coat of primer paint, to seal them a bit, but it’s not absolutely necessary. Decorate them with acrylic paint or try fingernail polish in thin even layers – making sure you allow enough dry time in between. Finally, I sprayed them with a light coat of clear poly spray paint. This just gives it a glossy coat if your paints leave a matte finish. Again - NOT a necessary step. 

Adding detail is a great exercise in fine motor skills!

Iridescent paints add a beautiful sheen. I added that to the 3 tokens, pictured below, that I made for my trip. I'll be sharing a fun activity for loved ones that incorporates the tokens in  the next couple of days...

   
You can find a leather, satin, or suede cord at any discount or craft store if you wish to make a necklace. Yarn would work too! My little man designed a glossy emerald Green Lantern pendant.

"If love be treasure, we'll be wondrous rich."     --Thomas Otway

Thanks to Sarah for sharing such a fun project with us - Love You!

Cheers!
J

Visit J at http://livingfromthisdayforward.blogspot.com 

*I'm J...a now-single mama of two, who hit a big bump in the road, navigating my way down an unexpected new path one day at a time. My babes are my light and my lens to see the best in everything. We play, we create, we explore, we laugh, we love. The laundry is a little backed up, and dinner may be less than impressive, but our hearts are full and we'll sleep well tonight. Grab your munchkins and join us for some fun...this is what we're up to today!