Sunday, March 3, 2013

Rock Your World


*Monday with J, guest post

When we settled on a solution to disguise a large stubborn patch of dirt that refused to grow grass in the front of our house, we had no idea we were installing a playground as well. We decided on river cobble to cover the area. My little man was just two years old and wanted to be involved in everything - especially that beyond his years. We gave him his own tiny orange and blue Diego work gloves and a full-sized shovel, and he jumped right in beside us. It was hot and I was pregnant - neither of which would stop a determined mama with a project in mind, especially this mama. We had a truck full of rock and boulders for a border, and we began.   

That little 'solution' has provided hours of adventures and memories over the past few years. Sometimes the area is hot lava and the stepping-stones are your only chance at survival. If you should fall…sudden death. Other times it transforms into a sea full of hungry sharks. Again...slip? Goner. 

My little lady is a sucker for "cleck-tions" so she has spent many a whimsical moment in her own magical world searching for rocks that speak to her - that present a certain sparkle. We've spent time scrubbing the rocks, built worm houses with them, prepared gourmet dishes with them, filled puddles with them, and painted them. The Rocks Out Front are our inspiration for today... 

I'll call this project: Rock Your World

It's simply a spin-off of the traditional Pet Rock. 

Supplies

Rocks
Felt / Yarn
Google Eyes
Puff Balls, Feathers, Gems, etc. 
Craft Glue (Tacky works great)


Start by taking a walk outside with your babes to collect the rocks. This, in and of itself, is an adventure to be had. I find rocks fascinating. I collect rocks from every adventure I embark upon and find special places for these treasures, to preserve the memories that accompany them, in my landscaping at home. I have rocks from the North Shore, Florida, Mexico, The Bahamas, Hawaii (Nooo..did I? But the curse?!) Grand Marais, Nanni's ranch, my favorite cabin up north...you get it. 

I have a growing Heart Shaped Rock collection in common with my sister and mom. I find one every time my babes and I head to our favorite hideaway for a nature hike. They practically jump out and trip me now. You will find them living in cozy little nooks on shelves and furniture all around my house. 

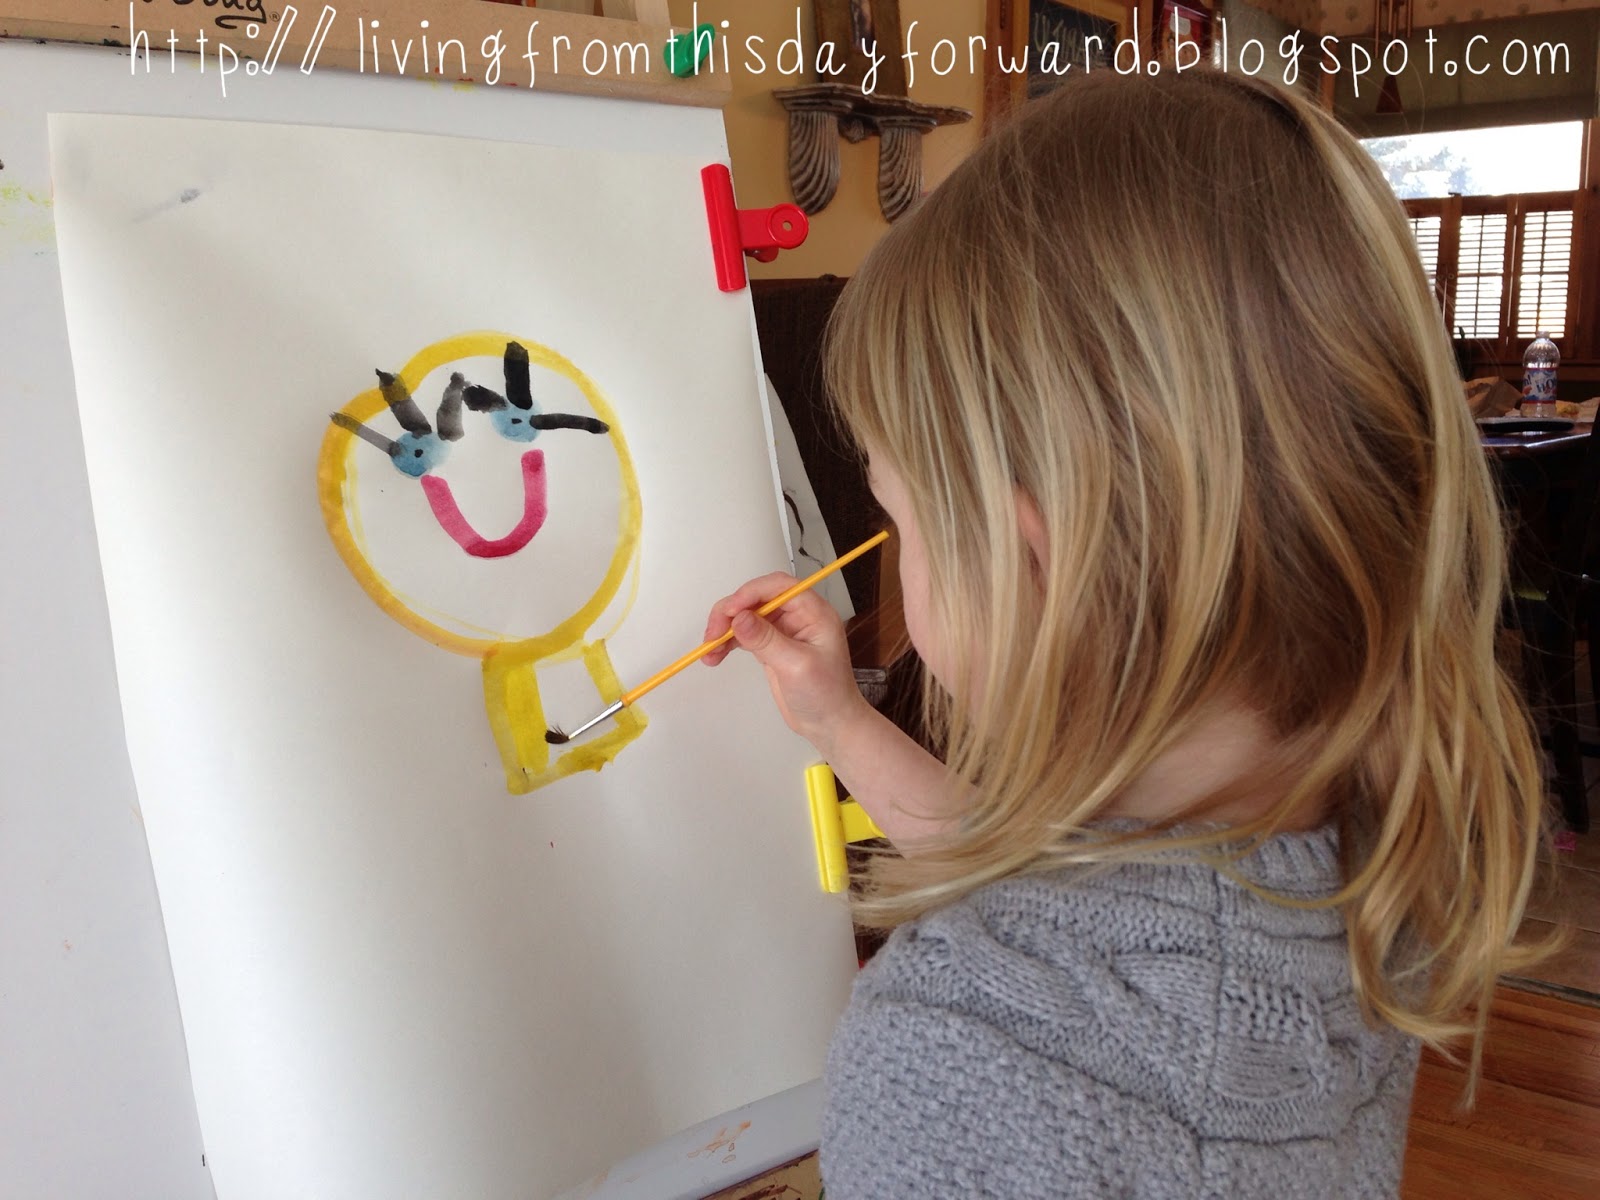
If you spend a moment reflecting - checking out a rock from all angles - they almost tell you just what they should be. You may see a head, a perfectly placed little crevice for a mouth, or a suitable shape for a body. What a wonderful exercise for a child's imagination! Pack a snack and pop a squat right down in them, brainstorming the type of 'pet' you'd like. 

I give the rocks a good scrub first, but I also have a lazy old dog and the rocks are riiiiiight out front. You never know. Let them dry for a bit in the sun or by a warm vent. You can choose to give your rocks a little sheen by spraying them with a clear poly - inexpensive and available at any hardware store paint department for a few bucks. Lightly coating the rocks captures their natural color a bit - the saturated tones that appear when the rocks are wet. This takes some time to dry so plan accordingly...in other words, kids are impatient and you may need to prep some ;)

From here let your imagination take the wheel...use felt scraps to create fins, yarn for hair, silk flower petals, beaks, anything to bring your ideas to life. Use a small amount of glue so that you don't have the extra squishing out all over. Hold the pieces in place for a brief moment to secure. You can make eyes from felt (see the Rock of Love below) or find google eyes in a variety of sizes at any craft store. I've decided google eyes never lose their humor. 

An easy way to make hair:
tie a knot in the center of a bunch of yarn.
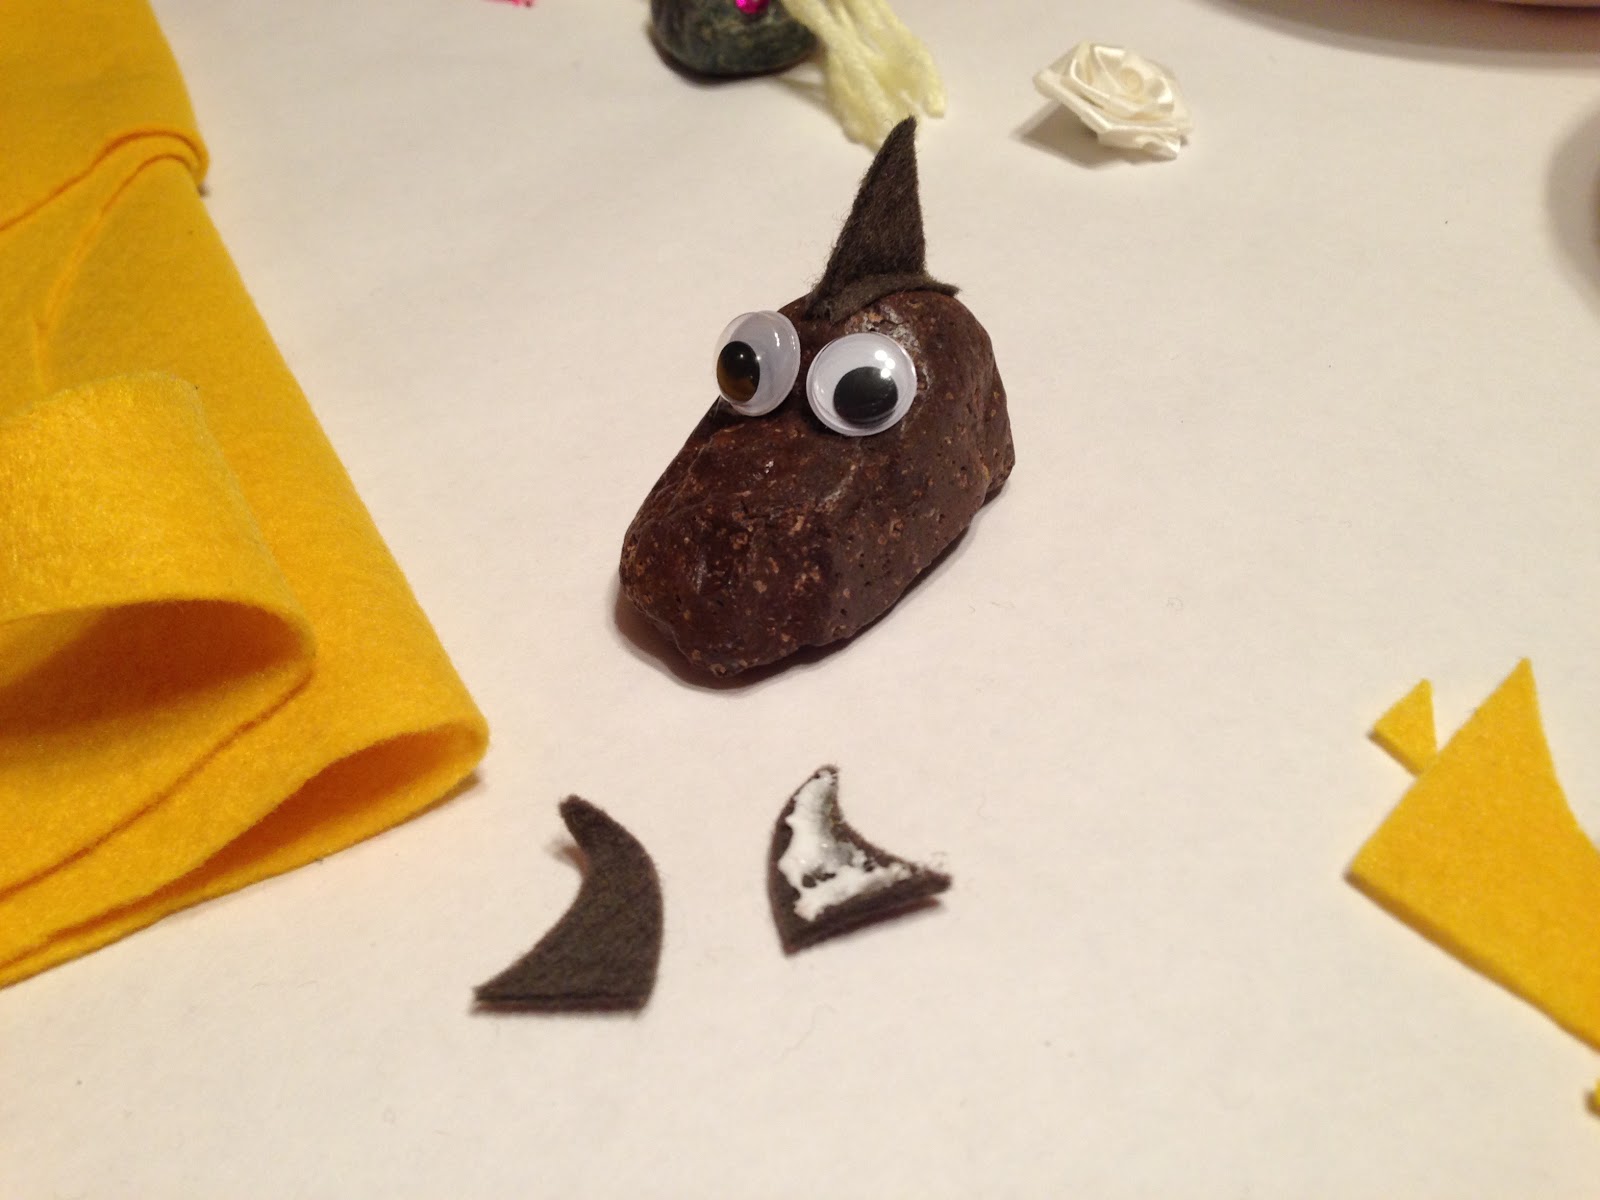
Make fins two-sided and spread the bottom out a bit
to create a wider surface to adhere to the rock. 


Meet out friends...


If you find yourself caught between a rock and a hard place, make yourself a friend. 

Cheers!


 *I'm J...a now-single mama of two, who hit a big bump in the road, navigating my way down an unexpected new path one day at a time. My babes are my light and my lens to see the best in everything. We play, we create, we explore, we laugh, we love. The laundry is a little backed up, and dinner may be less than impressive, but our hearts are full and we'll sleep well tonight. Grab your munchkins and join us for some fun...this is what we're up to today! 

Monday, February 25, 2013

Habitat Sweet Habitat


*Monday with J, guest post

He stood tall...one foot cocked on its side, his hands close to his body tightly gripping the bottom hem of his shirt, a soft smile spread across his face - all suggesting a bashful pride in his newly constructed masterpiece. 

He wanted to enter the Imagination Fair at school. I was thrilled. It took me back to the days of working with my childhood friend, Billie, on The Moon Base project for science class. My Superhero mom helped us bring our ideas to life and we took 1st place. 

He decided on a Monsuno Habitat for his tiny articulated plastic creatures - tailoring to the electrical, water, ice and fire types. Everything had its place. He beamed at the sight of the satin blue participation ribbon that he earned and it was proudly displayed on the exhibit. 
Monsuno Habitat. Proud boy.

We committed to the Fair and it was time to begin. I had the babes start by drafting a habitat design in their new binders, freshly coated with stickers, that we found thrifting earlier that week. Score. We decided to recycle a foam packing material that we had repurposed into a Lego Ship years earlier. Seriously, save these things - you know the large styrofoam pieces that pad new TV's or appliances? They are canvas for the imagination! 


I purchased felt in a variety of colors to simulate earth, lava, water, ice, etc. I also picked up a bag of dried moss. For the rest...we put on our coats and boots and took a walk outside. We gathered sticks, rocks, and bark from our wise old trees. 

This became the inspiration for our project today. Let's get started on a habitat that could be easily created in your home... 

I'll call this project: Habitat Sweet Habitat


Supplies

Styrofoam Packaging 
Cardboard boxes - any size
Scissors
Felt
Glue - Tacky Glue works great
Moss, Sticks, Rocks, Bark, Flowers, etc. 
Small plastic animals / dolls / cars (dollar store is a great place for these!)

First, you and your babes will need to decide what type of habitat you would like to build. Take this opportunity to teach them what the word means and brainstorm options, as well as the elements, that would complement each. White felt would make great snow! Why not try an underwater creature scene? A mini-doll house is also on our list. The sky is the limit...and baby blue felt makes a great sky!

For our Country Cow Habitat - pictured above: 

-Start by cutting the top 4 flaps off of a small box. 

-Next, cut a piece of light blue felt the size of the bottom of the box (that will become your backdrop) and glue it down. If you'd like to add a cloud, cut that in white and glue it to the blue felt now. A sunshine would be a great addition too. 

-When it's had a minute to dry tip your box on its side. We added rocks, a twig nest with eggs (confused? No. Either that's a dinosaur or one sweet omelet), a sprig of artificial flowers for our 'tree', and moss to simulate grass and a pasture. Voila!

-Reminder: dollar stores are great places to find little plastic creatures. 

As you could expect, little sister was not to be left behind on this project. She had ideas of her own and dove right in beside us, unguided. The little lady decided on a Fairy Habitat. She had six special little wandering fairies that needed a place to call home. The scraps of paper were flying and glue was strung from surface to surface as she positioned gems, glitter, and treasures from her personal collection.

Wikipedia defines a habitat as...
...the natural environment in which an organism lives, or the physical environment the surrounds a species.

While glitter trails and sparkly gems may not be considered 'natural' to an environment, I think my babe's fairies would beg to differ. It was perfectly suited. She made them a slide (paper towel roll), a glitter river (duh), second level bedrooms with wallpaper, and a hot tub. And she's nowhere near finished. 


In the end, the blue ribbon earned a prime spot in my little guy's bedroom, the cows are content tending their nest, and the fairies are soaking in their tub. Just another day at home. 

Home is a starting place for love and dreams...   -unknown


*I'm J...a now-single mama of two, who hit a big bump in the road, navigating my way down an unexpected new path one day at a time. My babes are my light and my lens to see the best in everything. We play, we create, we explore, we laugh, we love. The laundry is a little backed up, and dinner may be less than impressive, but our hearts are full and we'll sleep well tonight. Grab your munchkins and join us for some fun...this is what we're up to today! 

Cheers!
J  

Monday, February 18, 2013

Happiness Gallery

*Monday with J, guest post...


She needed a gallery of her very own, a place to surround herself with images that evoke happiness. Art isn't something she does; it's who she is. Her art is free from technique and warrants itself, needing not the justification or approval of others, but a simple nod from her blissful heart. 

Her art was a window to her soul and a reflection of the dreamer that she is. 

My little artiste dives into creation with wild abandon. She requires no guidance or prompting. Her inspiration comes from within. She passes by the art locker on the way to the breakfast table and it begins...a day full of sketching, painting, cutting, gluing, dreaming, constructing. She sees potential in every scrap she meets - and these 'treasures' make their way home in her pockets, already mentally assigned a role in her next project. 

Here's the hitch, when one creates with wild abandon...there is a LOT of output. Her precious creations, each one loved by her as much as the next, make their way to her bedroom walls. They are carefully hung with several (at least 6) long strips of tape - and occasionally glitter glue.  I have adored her method of display for quite some time, but it was time for a change. 


I'll call this project... Happiness Gallery

Growing up with a 'thrifter' or 'junker' for a mom (seriously, not an insult), I'm no stranger to seeking out deserted goods to repurpose. I was in search of frames to create an art gallery on her bedroom wall. I was looking for substantial frames with interesting detail and texture. Like the kind of frames that typically house engagement or wedding photos, for example. Coincidentally, I had two on hand. And in the spirit of making lemonade out of lemons, I began...


I chose cheery paint colors that coordinate with her bedroom decor. I spray primed the frames first to create a surface ideal for the paint to adhere to. I followed that with two light coats of colorful spray paint - butter yellow and poppy pink. Make sure to follow dry time instructions before moving on to the next step. 


Note: if your frames are constructed with metal prongs for holding the glass in, they can easily be removed with a pliers to make them safe to work with. Gently twist back and forth while you pull them out and discard.


I prefer finishes with a hint of 'age', so I decided to add a wash of white over the top of the color. This is simply done by lightly brushing over the frame with a semi-gloss or gloss paint in the white hue of choice. Once you have brushed the paint over the surface of the frame, immediately follow up by rubbing most of the paint off with a non-lint rag, such as an old white t-shirt. The paint will collect in the nooks and crannies of the frame and add character and depth. 

I carefully removed the little works of art from her walls, admiring each one with tears pooling in my eyes as I did. I'm putty when it comes to her creations - they literally squeeze my heart. I arranged the frames on the wall, adding in one antique frame that I've had displayed various other places in my home over the years.  It's best to find a stud to nail into, depending on the weight of your frame. There are many convenient hanging hardware options available in any hardware store. Make note of the weight of your frame beforehand so you can select a kit that suits your needs. 

I worked on the frames late at night, after bedtime, in the basement (please use proper ventilation!) in order to keep the project a surprise. I scurried to hang the frames and clean her bedroom (no small feat on the cleaning part) one morning while she was at preschool, in anticipation of the big unveiling. 


She walked in with her eyes pinched tightly closed. When she opened them a big smile slowly crept across her face. She climbed up on her bed, sat on the side rail, and squealed. She was thrilled and dove right into painting the very first masterpiece for her personal gallery... 


"Art enables us to find ourselves and lose ourselves at the same time."              -Thomas Merton


*I'm J...a now-single mama of two, who hit a big bump in the road, navigating my way down an unexpected new path one day at a time. My babes are my light and my lens to see the best in everything. We play, we create, we explore, we laugh, we love. The laundry is a little backed up, and dinner may be less than impressive, but our hearts are full and we'll sleep well tonight. Grab your munchkins and join us for some fun...this is what we're up to today! 

Cheers!
J  

Monday, February 11, 2013

The Ultimate Food Challenge

*Monday with J, guest post...


I was dreaming up a way to get my babes excited about trying new foods. I was growing quite sick of making the same kid acceptable meals each week, and very tired of slaving away (that may be a bit of an overstatement) on new meals, only to be followed by the time-intensive coaxing necessary to get said meal INTO their bodies. I decided a challenge was in order...enter: The Ultimate Food Challenge

Now, I could of been satisfied by selecting a large piece of paper to post on the door for the challenge, but anyone who knows me well, knows that wasn't gonna happen. Enter project #2...I've always wanted to create a chalkboard on a wall or door in my home for penning thoughts of inspiration or sweet nothings. The two projects married, and since I was not, there wasn't anyone telling me I couldn't paint one right there on the door in the dining room, and hang a custom trim frame around it. Moving on...

I wanted the challenge to be fun, I wanted the kids to be excited about it, and I wanted them to be in charge of their adventurousness. 

I decided that we'd keep two columns, one for each child, and as they tried new foods we would add them to the board. Now, we're not talking a reluctant minnow bite from the edge of a crumb on the particular food item - we're talking one large bite, chewed and swallowed. I introduced the challenge as a privilege, and not being a huge fan of the overuse of 'immediate reward' (material or physical, that is), I settled on offering a trip to the DQ for a celebration ice cream treat once the board was completely full.  

I could not have anticipated the level of participation this would ignite. The kids were eager to try most anything that came their way. We laughed, we chanted, we cheered and at the end of the day, they were gaining confidence and bravery as a result of the challenge. It also became a contest between the two if one was to pull ahead. The game was ON. 

There are many ways to go about making a food challenge board. You could use tag or poster board, a dry erase board, hang an existing chalkboard in clear sight (that is key), or hang a large picture frame with a chalkboard painted insert.   


If you are interested in going the door chalkboard route (pictured above) these are the steps I took: 

-Decide on the location and size of the chalkboard you'd like.
-Tape off the area on a door or wall - use painter's tape, and a level and tape measure, to keep lines parallel.
-If you are dealing with a varnish finish, like I did on my old wood door, prime the area first. Use a foam roller for best results (that keeps bubbles and bumps off the surface)
-Once the primer is completely dry, according to manufacturers directions, add a coat of chalkboard paint. This paint is now available in many different colors as well, but I liked the traditional feel of the black. I think the writing pops more as well. 
-When the first coat of paint is dry I used a very fine sandpaper to smooth the surface a bit, and then added a second coat. 
-Choose a color and style for your chalkboard trim. I chose a warm mustard yellow...it's dreamy against the crisp black board. 
-I used a chop saw with a sharp blade to cut the appropriate angles in the trim to build a frame for the board. This is something you'll want to enlist a handyman/woman to help with. It can be a touchy game. 
-Finally, I painted the trim pieces (before hanging) and then mounted them to the door with brad nails to form a frame - you don't need them to support much weight, just hold the pieces in place. 

Funny, my neighbors no longer cast confused looks my way, for example, when I march out of the house with safety googles on and saw something right there on my front stoop. If 'very pregnant woman rolling large hollow log down the backyard hill for a custom planter' didn't phase them, this wouldn't either. They've really seen it all. (I need to shout out to my parents for instilling those skills - love you!)

Let the games begin! I bought some inexpensive colored chalk, sketched a bold game show-esque title, and gave them each a column to record their conquests. As a reminder, I think it's key to be large, in plain sight, and in the eating area in order to be top of mind. 

Occasionally, when presented with something especially 'different', I can see the mental process that ensues while they contemplate the bite (analyzing texture, color, smell), and after a brief pause they'll look up and ask, "can this go on my food challenge?" Why yes, yes it can.

This exercise has made a huge difference in my children's willingness and enthusiasm to try new foods...whether there is a challenge in progress or not. It has helped to form a habit that goes beyond our dining room table.   

I would love to see what you create! Message me with your finished product.
Visit J at http://livingfromthisdayforward.blogspot.com for this post and more...

*I'm J...a now-single mama of two, who hit a big bump in the road, navigating my way down an unexpected new path one day at a time. My babes are my light and my lens to see the best in everything. We play, we create, we explore, we laugh, we love. The laundry is a little backed up, and dinner may be less than impressive, but our hearts are full and we'll sleep well tonight. Grab your munchkins and join us for some fun...this is what we're up to today! 

Cheers!
J