Monday, May 13, 2013

Window Bling

*Monday with J, guest post.


The playhouse. Oh, how I love this cozy little house out back. I remember securing this treasure like it was yesterday.

I grew up with an adorable little custom playhouse in the backyard of my childhood home. Mom & Dad moved it in and built and created all the fixings for the inside. We entered a different world as we stepped across that threshold.

I wanted to share that memory with my own babes. After looking for plans and pricing out materials for a playhouse, I remembered we had nobody to build it. Hmm. Square one.

Not spending one ounce of thought on how one would move a structure; I hit Craigslist in search of one. I was sure there had to be a tiny home that had seen better days, filled with the chatter and laughter of the children it raised, and longed to fill that role once more.

Bingo.

I stated my case, and then restated it a few more times (a skill I perfected as a child while lobbying for trips to Valley Fair, sure I would be a lawyer) and convinced my parental co-pilot to go take a look.

There it was…an adorable little home, sitting lonely on the corner of a farm down south.  Its children had since traded their time playing kitchen and house, for team sports and sleepovers. It sat empty collecting dust while the spiders covered it in cobwebs.

It begged us to love it. Okay, it begged me to love it.

He negotiated the price and it was ours. One problem. It was built like a brick you-know-what, to real live home standards, with a loft, and therefore weighed a ton -possibly literally. Long story short, we had a connection and it would be delivered.

I was over 6 months pregnant and got a call that the house would arrive, by flatbed truck (?!) that afternoon. I researched a proper foundation, packed up my little man toddler, and hit up Home Depot. I purchased the supplies and was home digging-in 2x4’s in quick time. Very pregnant, in the heat of summer, I gave the land a run for its money. Foundation? Check. I was really quite proud of that moment.

We were finishing up out back when I heard it…the rumble of the 40-foot flatbed that was parked in front of our modest rambler. And it was bigger. They carefully backed the trailer down the hill to the backyard and lifted the house onto my freshly secured foundation with the Bobcat that they brought along. It was a really big trailer.

Little Man’s eyes were wide and took in every step! It was so glorious.

I can remember feeling like a real grown-up in that moment. My parents were dream chasers and magic makers. I watched them do things like this all the time throughout my childhood, making big meaningful things happen with little resources. I had arrived.

Today, our playhouse serves as a secret fort, hunting shanty, spy headquarters, fairy home, snack shack, and domestic, mama-in-the-making dolly haven. The powers of imagination are magnified within the four walls of this snug house. Each year I add something to it. Last year I hung antique wooden fruit crates on the wall as shelves.

This year…custom window valances.

I’ll call this project…Window Bling

Supplies:

Sticks (can you believe we have any left - lots of nature projects lately)
Felt – I chose various shades of green for leaves
Glue Gun
Scrap Paper (for patterns)
Pins / Scissors
Hanging Hardware (measuring tape/drill/nails)


The custom valance my mama helped me make for my very first baby nursery inspired this project. The room was jungle theme and I wanted big, layered leaves as a valance over sheer cotton curtains. She nudged my ideas to grander places adding padding for texture and wire for shaping. It was the finishing touch that sealed the deal for me in that design. They still hang in the room that Little Lady has since taken over, tying memories together in my heart.


This week, as I was repositioning the valance in her bedroom after an all-afternoon rager with a 4-year-old girlfriend (play date), it came to me; I would recreate them in simple form for the playhouse.

I started by measuring the width of the windows, frame-to-frame. Little Man was an excellent assistant and took the job very seriously. His voice seems to drop an octave in these situations.


With sticks on the brain (last two weeks worth of projects) we had a suitable curtain rod. Find sticks that are relatively straight, somewhat sturdy (doesn’t require a lot of weight), and long enough to overlap the frame a bit. Take a rock in your hand and sand the surface of the stick a little to remove loose bark or debris.

I chose three shades of green for my leaves to provide texture and dimension. I freehanded a few leaf shapes on copy paper to make a pattern. Cut leaves, estimating the number you’ll need based on the width of the window and length of the stick. Fold the felt in half, doubling it up to cut two at once, speeding up the process. I found it helpful to pin the pattern in place before cutting.


Find the position in which the stick lays the flattest against the window frame and mark the ‘FRONTS’ of the stick with tape. Layer the leaves along the front of the stick making sure they wrap over the top and around the back of the stick a little to hide the edges. When you are happy with your layout, glue them in place at the very top of the leaf with a glue gun. You are only tacking them in place – no need to overdo it.


There are many options for hanging the sticks (rods) and your hardware store will have them on hand. Our windows had wood frames and I decided to attach the sticks directly to the frame with a thin nail.

Little Man helped me pre-drill a small hole through the stick and then we just nailed them up in place. God, I love that kid. I made sure the nail was long enough to go through the stick and enter the frame deep enough to remain sturdy. 


Spread love everywhere you go: first of all in your own house…let no one ever come to you without leaving better and happier.   ~Mother Theresa

Cheers!
J


*I'm J...a single mama of two, who hit a big bump in the road, navigating my way down an unexpected new path one day at a time. My babes are my light and my lens to see the best in everything. We play, we create, we explore, we laugh, we love. The laundry is a little backed up, and dinner may be less than impressive, but our hearts are full and we'll sleep well tonight. Grab your munchkins and join us for some fun...this is what we're up to today!


Monday, May 6, 2013

Nature Mobile

*Monday with J, guest post.


Still blending the natural with the brilliant around here. We’re on a roll, judging by the last couple of project posts. The Adventure Sticks served us well on our nature hike last week; locking our keys in the car at the nature park and one babe plunging into the river head first, not so much. After said event, I considered revising the sticks to include a hook-end for such incidents. On the upside, we were rescued, had a great hike, connected with Grampa Walt on a celebration day (address: heaven), and the kids witnessed the beauty and humor in one of life’s greatest lessons: Water Off A Duck’s Back…or your sister’s, whatevs.

Perhaps it is the lack of spring and extra dousing of snow we received in the past week that has left us craving the signs of new beginnings from nature. We decided to bring it indoors.

Alongside Little Lady’s Happiness Gallery we created earlier this year, this project found the perfect home.  This little girl’s room screams whimsy, as does her soul.

I’ll call this project… Nature Mobile  (see also variations below for home décor)

Supplies:

Large interesting stick/branch
Yarn / Twine String
Tacky Glue
Scissors
Tinfoil
Decorative Napkins or Magazine Clippings
ModPodge (bonding/sealing medium)
Small sponge brush


Search outside for an interesting looking stick. I chose one that was large, a little crooked, and offered a forked branch for interest and dimension. Our dangles will hang from the branch to create a mobile effect.

Choose a fave color of yarn to wrap the branch. For a finished look, add a thin line of glue at the end of the branch and tack a small tail of yarn in place. Begin to wrap the yarn over that tail and around the branch until fully covered. I like to use a light strip of glue down the whole length of the branch while wrapping, for added security. 


The finished branch will look something like this...


The branch alone would make a really cool conversation piece for your home. I’m going to wrap some and gather them in a bunch near my fireplace or bookshelf.


To make the Dangles:

We played with tinfoil to create shapes (as the base) of different creatures including butterflies, dragonflies, and birds. It’s easy to mold/shape and remains lightweight. You really just have to let your imagination guide you as you manipulate the tinfoil – there is no formula!

For butterflies and dragonflies, I used one section of tinfoil for the wings, pinched it together in the middle, and shaped a wing on each side. Then I took a smaller scrap of foil and scrunched it into a long stick shape. I bent it in half and folded it around the center of the wings (where you pinched them together) to create the body of the butterfly. Add a bit of Tacky Glue to keep them bonded. Don’t get hung up on symmetry – this is art!


I can’t begin to describe exactly how we constructed the bird…again, just start at one end of the foil and begin to shape one end of the creature, like the head. Shape an extension for the beak and work your way down the body. If you need to add more foil just scrunch or pinch it together with your existing structure. You could also add a spot of glue to bond them. I created the body separate from the wings.

For the wings, I took a small sheet of foil and scrunched it together in the center, like I did for the butterfly wings, and pressed that spot onto the bird’s belly. Wrap the sides around the bird body until you reach the area in which the wings belong. Shape them flat from there and add a spot of glue.


That’s a whole lot of words to explain: play with the foil, make shapes. Understand? There is no science to this.

Stringing Your Creations:

While you are adding the stick body to the butterfly or other creature, slip the end of a string in before pinching it tightly shut. Tie a double knot at that point for security and then cut the string, leaving a long tail for securing to the branch with proper dangle.


Decorating Your Creatures:

I used leftover party napkins with interesting patterns or color, as well as colorful clippings from magazines, to cover the tinfoil base of your creations. Crepe paper, think party streamers, works well too.

Work in small sections by brushing a little ModPodge onto the object and pressing on little pieces of print until covered. Add one final light coat of ModPodge when finished, to seal it in place. Let it dry. It can get a little messy (which is ok, and fun – try it!) so place wax paper or a coated paper plate under your work.   


If crafting your own creatures isn’t your thing…head to the craft store, purchase pre-made butterflies and birdies, and tie those babies on. It’s all good!

To Hang Mobile:

I tied a twine string near the center point of the branch, at two spots, for hanging. Little Lady already had a hook installed in the ceiling from the gauzy canopy that used to drape at the head of her crib. Please allow me a moment…sniff.

You could use an Eye Hook for hanging as well. They are sturdy when installed correctly, but also removable.

* Important note: please make sure your finished mobile is well out of reach of small children (far above), and securely fastened to avoid tangling or accident. This won’t support Tarzan.


Lie on your back, gaze into the space above, and dream. Your imagination is your soul, your passion, speaking to you. Listen carefully.     ~Mama

What's on your mind? Leave a comment or share a thought below – I love to connect.

Cheers!
J


*I'm J...a single mama of two, who hit a big bump in the road, navigating my way down an unexpected new path one day at a time. My babes are my light and my lens to see the best in everything. We play, we create, we explore, we laugh, we love. The laundry is a little backed up, and dinner may be less than impressive, but our hearts are full and we'll sleep well tonight. Grab your munchkins and join us for some fun...this is what we're up to today!

Monday, April 29, 2013

Adventure Sticks

*Monday with J, guest post.


A little something to bring along with you on your quest…no matter how far a distance it may be. A simple stroll down the road can become a magical expedition when you pack imagination. Kids teach us this. They remind us of the simple pleasures that get squeezed out of our cluttered adult brains. They have yet to be subjected to the unnecessary games we begin to play with ourselves as we move through life…and so they just be…and they dream.

There is something very grounding about walking with a stick. Maybe it provides focus; a feeling of purpose, or perhaps it calls to the adventurer in us. 

Step outside on the sturdy ground; observe nature’s illustrations, hear the outdoor orchestra, and take in the organic aromas of the earth in spring. Make a moment. Make a memory.

I’ll call this project… Adventure Sticks.

Supplies:

Large Sticks
Yarn/String/Decorative Trim/Ribbons (any scrap will do!)
Beads
Tacky Glue (surprised?)


We set out searching for the perfect branch. Our sturdy maples have been thoroughly schooled by Mother Nature this year so we had plenty to choose from right in our backyard. The kids wanted to find a nice thick stick that reached their shoulders, and begged them for a chance to shine.


If you have the gift of nice weather, this is a perfect activity to do outside. Round up your supplies and hit the driveway or lay an old sheet out in the yard.

It’s really very simple. Choose the materials that you are drawn to begin to fasten them to the stick. I like having a nice comfortable handle so we wrapped yarn tightly around the spot that feels natural to hold. You will find many types of cord and trim at fabric/craft stores that would work well.


The babes loved the dangles so we beaded strings and frayed metallic cord to make tassels. Knotting ribbon in various lengths creates texture as well. One of our favorite trims had tiny ornate bells strung with beads.

I love the blend of the natural and the brilliant.


Explore your backyard, take a walk down the road, hit the trail to your favorite park, or carve your own path in nature. Dream up stories of the magical powers the sticks may hold. 

Maybe you’ll use the stick as a tool for awareness and work through something weighing on your mind while you walk…pray on your journey, work out a stress, or relish an accomplishment.

How about gifting an Adventure Stick (or: Courage Stick, Grounding Stick, etc.) to an important adult in your life? The walk through life can be hard and once in a while we need something to lean on while we collect our strength.  

As we walk, I listen to the faint jingle of the bells tied around the stick respond to the rhythm of their tiny footsteps, and I mentally bottle it.

Their small hands grip the soft, comfortable threads wrapped around the branch. They like the way it feels against their skin. Occasionally they glance at their hand and admire its beauty.


Today remains a day of contradiction for me: one of great loss and of great celebration. I will honor the father I lost far too soon with a walk in nature with my babes. It’s what would make his heart happy… and ours.

What's on your mind? Leave a comment or share a thought below – I love to connect.

Cheers!
J


*I'm J...a single mama of two, who hit a big bump in the road, navigating my way down an unexpected new path one day at a time. My babes are my light and my lens to see the best in everything. We play, we create, we explore, we laugh, we love. The laundry is a little backed up, and dinner may be less than impressive, but our hearts are full and we'll sleep well tonight. Grab your munchkins and join us for some fun...this is what we're up to today!

Monday, April 22, 2013

I love you because... {Love Jars}

*Monday with J, guest post.


I feel I've always had an appreciation on some root level for my mother - who she is, the way that I felt  in her presence - safe, secure, and important, for the adventures and experiences she provided us with, and for the strength she has demonstrated through adversity. She taught us to love and care for others equally and housed an immense amount of compassion for others. She has always possessed a unique blend: capable, dreamer, planner and free spirit. I'm not certain what percent of her I am inside, but it's a significant and vital piece within.

However, it wasn't until I welcomed my own children into my arms and heart, that I awoke to just how deeply that appreciation runs. It's a profound recognition, a full circle ah-ha moment when you realize you are really one and the same, by design, as woman and mother. You share the same dreams - the same worries, challenges, guilt, accomplishments, celebrations, and rewards.

This has long been a favorite gift to give. I've offered it a few times throughout my life when the occasion or recipient is so special, a material gift just won't do. I would say Mothers are such recipients, and that this would make a wonderful Mother's Day gift. Don't forget the other moms in your life as well...friends, sisters, grams, etc.

I'll call this project: I love you because.. {Love Jars}

Supplies

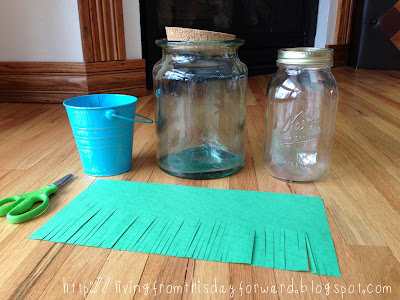
Container: Glass Jar w/ Cork Top, Small Metal Bucket, Mason Jar, Flower Pot
Paper (see suggestions below)
Embellishment: Paint, Markers, Silk Flowers, Ribbon
Scissors


For the version of this project I'm helping to organize in Little Lady's preschool classroom, we are using small pink buckets as a container. Measure a piece of green construction paper long enough to wrap and line the inside of your container. Mark the paper with lines, halfway across the width, and along the entire length of the paper, and have your babes practice fine motor skills by cutting on the lines to create grass (think fringe). Line the container with the fringed paper and tape the ends together to secure.

A terra-cotta flowerpot would make a sweet container as well. Your babes could personalize them with acrylic paint and embellishments. 

You could wrap a yummy piece of ribbon around the neck of a Mason Jar and tie in a sprig of silk flowers for texture.

Now it's time to get cozy...grab some paper and a pen, and create the real gift. Reach to the past to gather all of your best memories related to, or created by, that particular Mama. What do you love most about her? What has she taught you? What feelings surface when you're thinking of her? Swell her heart. She deserves it. Write these memories and thoughts on small slips of paper. Fold them accordion style and fill up the jar with love. 

You could pen the notes on the back of sheet music or decorative paper to add color and interest. How about making copies of old photos with mom/gramma/sister and write on the back of those?! Eeek…I’m doing that. (Mom is reading…act surprised, Mom.)

I copied photos on card stock in both color and black & white for variety and penned my memories and praises on the backside. The pictures look great displayed in the glass jar. I made sure to add one of my favorite shots of Mom as a little girl. Treasure.


Don't forget to add a tag noted: I Love You Because...

Most of all the other beautiful things in life come by twos and threes, by dozens and hundreds. Plenty of roses, stars, sunsets, rainbows, brothers and sisters, aunts and cousins, comrades and friends - but only one mother in the whole world.  ~Kate Douglas Wiggin

Leave a comment or share a thought below – I love to connect!

Cheers!
J


*I'm J...a single mama of two, who hit a big bump in the road, navigating my way down an unexpected new path one day at a time. My babes are my light and my lens to see the best in everything. We play, we create, we explore, we laugh, we love. The laundry is a little backed up, and dinner may be less than impressive, but our hearts are full and we'll sleep well tonight. Grab your munchkins and join us for some fun...this is what we're up to today!

Monday, April 15, 2013

Conversation Cloth

*Monday with J, guest post.


I'm a highly sentimental being. Maybe it's a product of learning big loss at a very young age, witnessing first hand that each moment that passes is one less we may have in this place or with these people. Or perhaps it's in my blood, passed down from a mother and grandmother who cherish every little bit of every little thing that ever made a memory. In any case, I think it has much to do with the little things...noticing fine details within the big moments. Those snippets are what pull at my heartstrings hardest and become the headliners in my collection of memories.

I like tradition and ritual and the love that is poured into them. I like understanding and revisiting my roots. I like having snapshots into my childhood and the idea of knowing that I’m able to create the same for my babes.

Sentiment and nostalgia are the inspiration for this project.

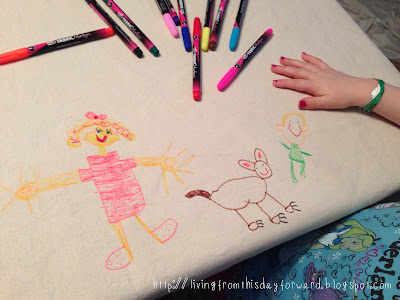
I laid out a large piece of cloth on the dining room table. I spread an assortment of fabric markers on the cloth and invited my babes to join me. You can imagine the delight in my children's eyes when I explained to them that I this is a tablecloth that we can draw on...draw anything we wish. 

Not much is off limits when it comes to creativity in this house…but writing on the table? New level. They glanced down at the cloth, back up at me with an ‘are you sure’ expression, and then started in with big grins.

I knew it would be an instant hit with Little Lady. What surprised me is that big brother joined in just as enthusiastically. He stretched himself creatively and quietly commented how much he loved the project numerous times during our sessions. The first picture he surprised me with was a little red heart with ‘I love you Mom’ penned inside. Melt. Puddle. Clean up in aisle 1.

I sat with them and sketched a few messages and pictures, and we created the kind of moments together that I dream they'll carry with them…to add to their little suitcases full of the bits that I’m hoping will serve them well throughout their journey through life.

We will bring this cloth out, now and again, as they grow. We’ll invite cousins to join us and leave their mark. We’ll capture Nanni & Poppa’s autographs and commemorate holidays and milestones. And each time we spread it on the table, we’ll take a minute to recount it contents and its meaning to our hearts. 

I’ll call this project… Conversation Cloth

Supplies:

Large piece of sturdy cloth to fit your table (think ~ 8 in. hang over on each side)
  -there are many fabric options: heavy cotton, twill, canvas, etc.
Permanent Fabric Markers
Sewing Machine or Iron Seam Tape (if you need to finish the edges of the cloth)

It is best to choose a heavy-weight material to draw on. The fabric doesn’t shift around or scrunch as much as the kids draw and the markers bleed less, allowing for cleaner lines in their art. I chose canvas in a natural tone.


Keep in mind that if your fabric has high cotton content you are going to have to iron it after washing. Cotton has a tendency to wrinkle. I think an 8 in. overhang on the sides of the tablecloth looks nice.


Purchase a set of permanent fabric markers at a craft store, or craft department of a discount store. It’s important to use something permanent, made for fabric, so that it will withstand any necessary washing. I washed my cloth before to remove any factory finishes that may prevent your markings to set permanently. I had to iron after washing as well. 

Spread the cloth on the table. If you are worried the markers will bleed through the fabric (depending on it’s thickness) place cardboard, poster board, or craft paper underneath while they draw. Note: follow the instructions on the package of your particular markers so you know how to properly care for the finished piece. You may want to test wash a small piece before attempting to wash the decorated cloth. 

Throw structure to the wind and let them draw whatever their hearts desire. Sit down beside them and make a moment.


Let the babes doodle while you prepare dinner. Make a tablecloth for a birthday party and let the children draw and sign their names. Bring out the cloth on the holidays and have loved ones leave a special message. Or consider personalizing a cloth as a gift for someone special.

“Of the most valuable treasures in my life are those moments woven from both the past and the present.”       -Mama

Leave a comment or share a thought below – I love to connect!

Cheers!
J


*I'm J...a single mama of two, who hit a big bump in the road, navigating my way down an unexpected new path one day at a time. My babes are my light and my lens to see the best in everything. We play, we create, we explore, we laugh, we love. The laundry is a little backed up, and dinner may be less than impressive, but our hearts are full and we'll sleep well tonight. Grab your munchkins and join us for some fun...this is what we're up to today!


Monday, April 8, 2013

Wish or Worry...

*Monday with J, guest post.


We all have wishes. We all have worries. Sometimes we wish we didn’t worry so much.

This is a project from my childhood that I took great pleasure in sharing with my own children earlier this year. I stumbled upon these tiny dolls in my storage room in a Caboodle (yes, you know it – small plastic container from your tweens that probably held your royal blue mascara) ...mixed in with my stash of colorful embroidery floss. This collection of vibrant string has seen the age of the friendship bracelet, cross-stitched my first 4-H sampler for entry in the county fair, and has woven clothing for little dolls made of Q-tips.

I picked up one of the characters and sat for a few moments, lost in the memories they stirred. I spent many an hour as a young girl creating collections of these little friends - while my mom was sewing away in the background - detailing each personality while experimenting with skin tones, hair textures, and clothing options. Some were fashioned to match or represent my friends and family. 

A childhood friend and I once made them to sell at our annual garage sale, alongside the friendship bracelets we labored over and stockpiled for weeks in advance. Little entrepreneurs, we were.

I guess the dolls were my version of the traditional Guatemalan worry dolls gifted to me as a souvenir when I was young…they were brightly-hued bitsy people, said to free you of the worries that you whisper to them in confidence. 

I’m a huge fan of working it out…reflecting, sharing feelings - good or bad - with loved ones in an effort to purge the hurts, cleanse the muddies, and celebrate the wins. A clean slate lends itself to fresh ideas. I’m keen on anything that encourages my babes to identify and deal with what’s inside. Perhaps these trustworthy little friends would be a good tool for your little ones to hand off the worries. 

I also believe in dreaming big dreams. Verbalizing your dreams and giving them life is the first step to chasing them. I like to think these dolls are great at multi-tasking and capable of big things...so share your worries, whisper your dreams, or makes a wish.  

Let's get started. Don’t worry…they’re easy.

Supplies:

Q-Tips
Embroidery Floss
Tacky Glue (thinking I should own stock in this by now…)
Seed Beads (optional, for eyes)
Scissors


(why does that arm look so lifeless...?)

You’ll start by cutting Q-tips to the proportions in the photo below. Glue the pieces together as shown with thin lines of Tacky Glue and let them dry. The fluffy ends of the Q-tips will serve as the head.


 Choose your gender, skin tone, and clothing style. Directions below for detailing your dolls…


For long hair dolls…start by gluing the end of the embroidery floss just below the neck on the side you designate to be the doll's back. Hold it down with your thumb while you begin to wrap the floss around the narrow neck part of the doll working your way up, over the fluffy section, row by row until the whole area is covered. Leave a small tail at the end to glue down to the back of the head when finished. You will glue the hair on as a separate piece once the doll is clothed.

For short hair dolls…begin by cutting small segments of floss in the desired hair color, about ¼ to ½ inch long. Glue these pieces to the top portion of the head section first, and then wrap the head in skin tone string (as detailed above) covering the base of these strands to finish. The hair will stand off the top of the head. You can give it a little haircut after the glue dries.

For clothing…you will follow this same stacked wrapping technique. Glue a small tail down to the back of the doll, hold it in place, and begin to wind and wrap the string around the body until covered. Finish by gluing a short piece of string down to the body.

For pants, I begin to wrap the waist section as listed above, but then I weave in and out of the sticks in a figure 8 pattern to give the appearance of separate legs. You can see an example of this in the picture up above with the red string. 

Blonde, brunette, redhead...short, long, curly…the options for hair are endless!
For curly hair, my own Mama taught me to dampen embroidery floss before wrapping it tightly around a wooden cabob skewer. Let it dry completely and you will have springy beautiful curls when you unwind!


Depending on how long you want the hair, wind string around two spread fingers to make a loop in the desired thickness. This will be the length of the hair laying across the dolls head, shoulder to shoulder. You will wind a bit more string around the middle point of this section of floss, just to hold it together. That will be the point in which you glue the gathered hair to the head of the doll.

Little Lady requested a Santa over the holidays. We plumped him up with a couple extra Q-tips on his belly before wrapping. (see middle figure in bare body photo earlier in post) She also requested Merida, from Brave. We let her firey locks flow. 


My little guy insisted the dolls have eyes. We rounded up some seed beads….big blues, of course. I prefer the less intense look of the expressionless faces, myself.

Paint and decorate a little wooden box for your dolls and keep them bedside. You can find an assortment of wooden treasure boxes at any craft store and customizing them is a project itself!

Throw your worries to the wind and set your dreams into motion…

Cheers!
J


*I'm J...a single mama of two, who hit a big bump in the road, navigating my way down an unexpected new path one day at a time. My babes are my light and my lens to see the best in everything. We play, we create, we explore, we laugh, we love. The laundry is a little backed up, and dinner may be less than impressive, but our hearts are full and we'll sleep well tonight. Grab your munchkins and join us for some fun...this is what we're up to today!